DIY Solar Charging Station: A Guide for the Tech-Savvy Traveler
Want a custom power setup for your adventures? This step-by-step guide shows you how to build your own portable solar charging station for a truly personalized off-grid solution.
SOLAR-POWERED GEAR
9/24/20253 min read
As a traveler, you’ve probably felt the frustration of a dead phone battery when you’re miles from the nearest outlet. You’ve likely considered a portable solar charger, but what if you could build a custom, high-performance station tailored exactly to your needs?
At Gadget Earth, we’re firm believers in self-sufficiency and innovation. For the hands-on, tech-savvy traveler, building your own DIY solar charging station isn't just a project—it’s an investment in your freedom. It allows you to create a more powerful and versatile setup than many off-the-shelf options, all while gaining a deeper understanding of your eco-friendly gear.
This guide will walk you through the essential components and simple steps to create a reliable, homemade solar station that will keep you powered up on any adventure.
Why Go DIY? The Benefits of a Custom Build
Before we dive in, let’s quickly look at why a DIY project might be right for you.
Customization: You get to choose the exact components you need. Want a high-capacity power bank for your laptop? You got it. Need a rugged, waterproof case for your backcountry trips? You can make it happen.
Cost-Effectiveness: Building a station yourself can often give you more power and features for your money compared to a pre-packaged product.
Learning Experience: Understanding how your power system works is invaluable. It helps you troubleshoot issues in the field and empowers you to make smarter energy decisions.
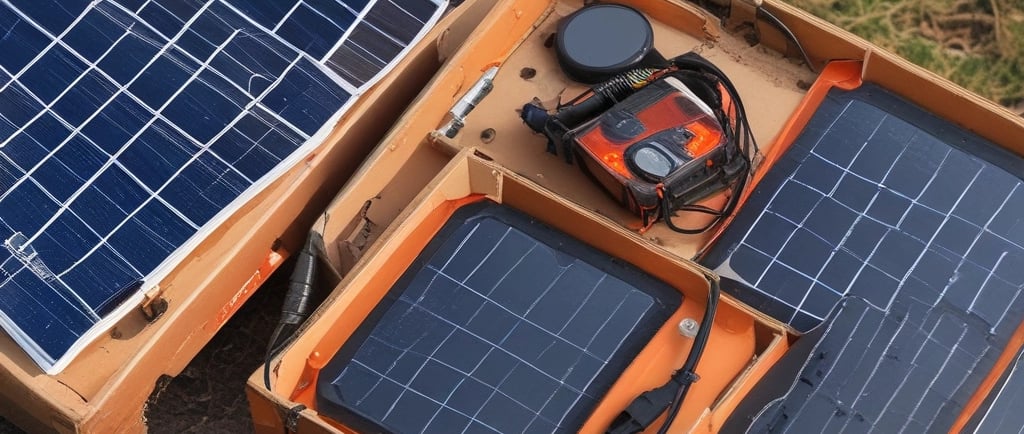
The Essential Components for Your DIY Solar Charger
For a basic yet powerful setup, you'll need just a few key components.
1. The Solar Panel: Your Power Source The heart of your station. For a portable setup, a foldable solar panel is the ideal choice.
What to Look For: Choose a panel with a high efficiency rating (monocrystalline cells are best). For a simple phone charger, a 10W panel will work. For a more robust station that can charge a laptop, opt for a 20-40W panel. Ensure it has a USB-C or DC output.
2. The Power Bank: Your Battery Hub This is where the magic happens. The power bank stores the energy from your solar panel to use when the sun isn't shining.
What to Look For: Choose a high-capacity power bank (20,000mAh or more) with multiple ports. A model with a USB-C Power Delivery (PD) input is perfect, as it allows for fast charging from your solar panel.
3. The Case: Your Protective Shell This will house all your components and protect them from the elements.
What to Look For: An inexpensive, durable case from a brand like Pelican or a similar waterproof, crushproof container is an excellent choice. This ensures your durable tech is safe from drops, water, and dust.
4. The Cables and Connectors You’ll need the right cables to connect everything.
What to Look For: Get a high-quality USB-C to USB-C cable for connecting the panel to the power bank. Have a variety of cables on hand (USB-A, Micro-USB, etc.) for charging your devices.
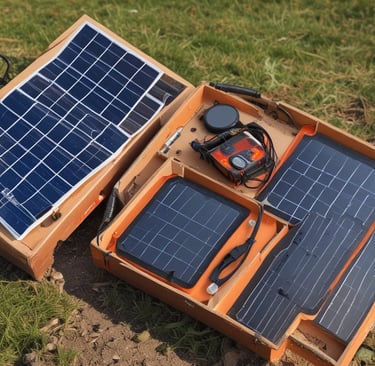
Step-by-Step Guide to Assembly
Building your homemade solar station is surprisingly simple.
Step 1: Gather Your Components Lay out all your components and tools. You'll need the panel, power bank, case, and cables. A small utility knife might be useful for making minor adjustments to the case.
Step 2: Connect the Power Bank to the Solar Panel First, fully charge your power bank from a wall outlet. Once you’re ready to test, connect the USB-C or DC output from your solar panel to the input port of your power bank.
Step 3: Test and Verify Unfold your solar panel and place it in direct sunlight. Make sure the power bank's charging indicator lights up. This confirms that the panel is properly generating and transferring power to your battery.
Step 4: Pack and Organize Carefully arrange the power bank and cables inside your protective case. You can use foam inserts to keep everything secure and prevent movement. Some makers even cut small holes in the case for the ports, allowing you to charge with the case closed.
Beyond the Basics: Upgrades for the Enthusiast
Once you have your basic station, you can take your travel tech project to the next level.
Add a Voltmeter: Install a small digital voltmeter on your case to monitor the power input from the solar panel.
Integrate a Light: Connect a small solar-powered light to your station for an instant work light or ambient camp light.
Use a Charge Controller: For a more advanced setup using a raw solar panel and battery, a separate charge controller is a crucial component to prevent overcharging.
Building your own off-grid solar station is a rewarding project that empowers you with the knowledge and tools to stay powered anywhere. It’s the ultimate expression of sustainable technology for the adventurous soul.
At Gadget Earth, we have all the components you need to get started on your DIY journey. Power Your Journey. Sustain Your World.
Keywords Used:
DIY solar charger
homemade solar station
build solar charger
travel tech projects
solar power hacks
off-grid solar
tech-savvy traveler
portable solar panel
sustainable technology
eco-friendly gear
durable tech
solar panel